
Since making my first Roorkee chair, which was based on the 19th-century original, I’ve been lucky enough to study some additional antique examples. This has led me to alter the chair’s design in about 20 different ways, from the turnings to the rivets.
While I don’t have room to discuss the evolutionary process and my reasoning (gotta save something for the book), I have promised several readers that I would post the leather patterns that I now use to build these chairs.
Below is a drawing I made of the three major leather components. (If you cannot figure out the armrests or belts, may I recommend golf as a hobby?) As to the sketch, I took enough drafting at Chaffin Junior High from Mr. Hogue to know that it’s not a proper mechanical drawing.
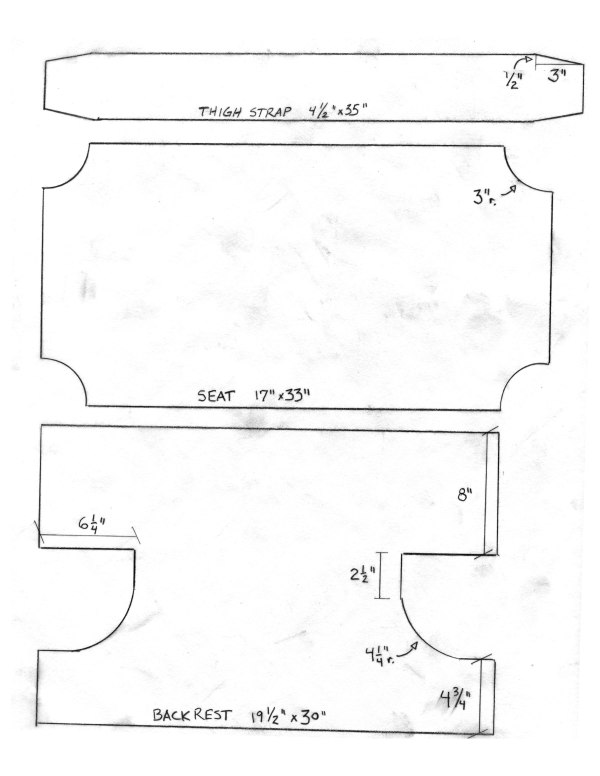
- Click on the drawing to enlarge it to full size. Then print that.
Truth is, most early furniture was made using an sketch that was one step above NapkinCAD 1.0 (right Suzanne? I haven’t forgotten the research for a future book on Gillows). So if you can’t make the leather bits from this sketch, might I suggest vertical Jarts as a hobby?
The leather is 8 oz. latigo we buy from a wholesale supplier in Pennsylvania. The straps are regular 7/8 oz. veg tan leather. Solid brass 3/4” buckles from Tandy. All the rivets are No. 9 1/2” two-part solid copper rivets. The 13mm ball studs for the armrests are from McMaster-Carr.
If you are making patterns for your leather, I recommend thin tempered hardboard, which doesn’t take up much space and holds up better against your knife.
OK, gotta go. “Campaign Furniture” ain’t going to write itself.
— Christopher Schwarz