
When I finally get to point where I’ve answered all my e-mail (sometime about July 2026), I might write a supplement or revision to the last bit of “The Anarchist’s Tool Chest” to include more construction information on different chests and the principles of their interiors.
When I wrote that book in 2010, I considered the chest in the book to be more of an idea than something that a reader would really build. I love (that’s the correct word) working out of a full-size floor chest and have since about 1997. But most people I talk to think it makes as much sense as using a gerbil to pull a plow.
This week I’m fitting out a traveling chest for an upcoming article in Popular Woodworking Magazine and am designing the interior to take advantage of every millimeter. Here are a few of the thought processes I use when designing the vertical space of a traveling chest (floor chests are different). Here’s a crude, shop-made sketch of the chest’s elevation in section.
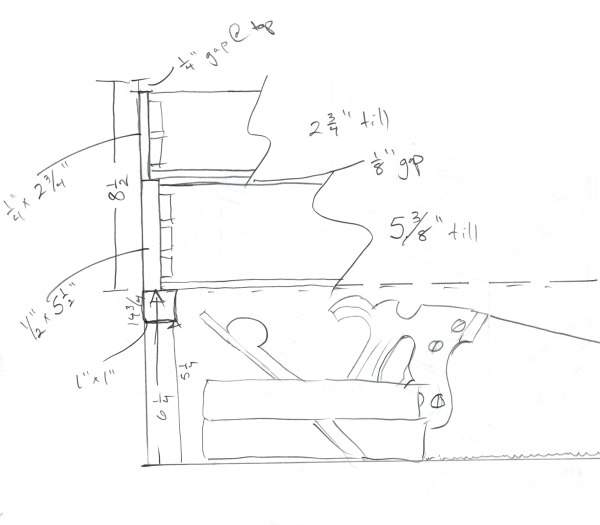
The Bottom Well
With a typical traveling chest, you aren’t going to be able to store your moulding planes on their toes – that would take up about 10” of your vertical space. So you store them on their soles so they eat up less of the chest’s height.
If you use panels saws – which is typical if you use a traveling chest – you need to be able to accommodate the full height of the saw’s tote. The saw tills on my traveling chests grab the panel saws at their toes. The heel of the blade rests on the floor of the chest.
And you need to be able to put your bench planes on the floor of the chest with their soles on the floor of the chest. If you use tools with a high cutting angle (moulders or bench planes), you have to be careful and measure their heights.
So when I design the bottom well, I start with a height of 6-1/4”. Unless you have any unusually tall bench planes or panel saws, that’s a good starting measurement.
The Top Till
After drawing out the bottom well, the next step is to sketch the top sliding till. This is the till that usually gets all your small tools that you use constantly – layout tools, block planes a mallet, wax, knives etc. So this till is generally not very tall. I have found that a till that is 2-3/4” is a good overall height. When you figure that the till’s bottom will eat up 1/4” of that height it leaves you with an interior height of 2-1/2”. I really like this height.
When positioning the top till in the chest, I like to leave a 1/4” (or so) bit of airspace above the top till. This gap prevents damage to your tools or chest if you slam the lid and a couple of your tools are accidentally piled on top of each other.
What’s Left
Then you divvy up the space between the top till and the bottom well. If the overall chest isn’t tall, I might put in another 2-3/4”-tall till. But I’d rather have a deeper till that is good for storing tool rolls, boxes of augers, my brace, hand drill and the like. If I can get a till that is at least 5” tall in there, then I’m pretty happy. If I can get a slightly taller one in there, even better. Once you approach 7” deep, however, it becomes a junk drawer.
— Christopher Schwarz
P.S. Apologies for the crude sketch.