Whether you’re doing an entire renovation or need just a quick fix, painting over existing varnished doors is a tempting way to update your home. But it doesn’t come without its trials. You can paint over varnished doors, however, there are some steps you need to follow to ensure the best finish.
Read on to learn how to paint a varnished door and refresh your home on a budget.
Can you paint over varnished doors?
The answer is yes! You absolutely can. There is a little bit of prep work involved and you’ll need to find a shady patch to set up your workspace in but if you’re looking for information on how to paint varnished wood doors white, it’s absolutely possible to transform your interior doors from drab to fab.
What you’ll need:
- Electric sander and sandpaper
- Paint rollers and paint brushes
- A damp cloth or vacuum cleaner for the sawdust
- A screwdriver
- Primer
- Paint
Step 1: Preparing the door
The first thing you’ll want to do is to prepare the door for painting. Start by taking the door off its hinges and laying it flat on a couple of sawhorses or workbench. Painting the door while it’s flat will help to minimise any drips and uneven paint that might happen if the door was upright.
Using your screwdriver, remove the hardware from the door such as the handle, kickplate, and lock mechanism – doing so will allow you to get the best and most professional finish possible.
Step 2: Sand the door
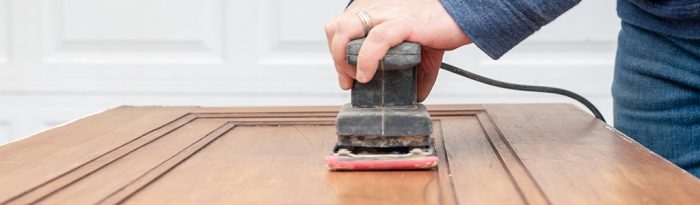
In order to get the best results, and to prevent the paint from flaking and peeling in the future, you’ll need to sand the varnish away. That shiny finish that varnish gives is paint’s worst enemy. In order to make sure the paint lasts as long as possible, use your sander and sandpaper to get into every nook and cranny to file away as much of the glossy varnish as possible.
Once you’ve done this, wipe the whole door down with a damp cloth or give it a vacuum to remove the dust and prepare the surface for the paint.
Step 3: Prime
Using a paint roller, brush, or a combination of both, apply your primer. Giving your door a coat of primer before the paint will help your top coat stick to the door more effectively and will also help to seal the porous wood against splashes and day-to-day wear and tear.
Allow the primer to dry fully before moving onto your top coat.
Step 4: Paint
Once your primer is dry, it’s time to apply your paint! Make sure it’s mixed up really well and apply a couple of even coats to the surface of your door. Make sure you let each coat of paint dry fully between applications to prevent smears and keep the surface nice and even.
Step 5: Add a top coat

This step is optional but will help the paint to stay pristine as long as possible. Adding a clear top coat of varnish to your door will make sure the colour stays vibrant and protects it from everyday wear and tear in your home.
Apply it according to instructions and let it dry completely before moving on to the next step.
Step 6: Reinstall the hardware
Once the door is painted and fully dry, you can reinstall the hardware you removed earlier. You may want to take this time to clean and polish the metal to help make it look new. Don’t forget to also clean, or replace, the screws so they don’t stand out from the rest of the hardware.
Step 7: Rehang the door
The final step is to rehang the door on its hinges. While you’re at it, why not fix up the door hinges too? Give them a clean and add a little lubricant to stop squeaks in their tracks before popping the door back on the hinges, stepping back, and admiring your handiwork.
Of course, if you don’t want the hassle of all the prep work that goes into painting a varnished door, you’ve come to the right place. We have a whole host of options to refresh your interiors including fully finished white internal doors, unfinished internal doors which only require a minimum amount of prep work in order to be painted, and primed internal doors which are ready to paint any colour you want.