This is an excerpt from “The Woodworker: The Charles H. Hayward Years: Volume II” published by Lost Art Press.
Runners. Generally the remedy is fairly obvious for worn runners—they are just replaced. It is merely a matter of removing the old ones, cleaning off any dried glue, and fitting fresh ones. There is one snag to look out for when there is no groove into which they fit. This absence of groove means that the exact position has to be measured, and there is the danger that the runners may be in winding.
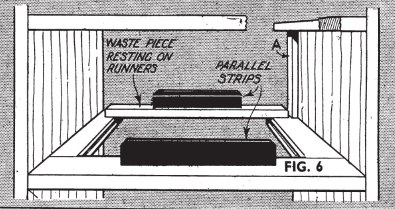
The best plan is to use parallel strips as in Fig. 6. Cut a piece of wood A to a length exactly equal to the distance between the drawer rails. Place it at the rear and fix the runner with nails or screws as the case may be. Put the one strip on the front rail, and the other on a waste piece reaching between the runners.
Obviously the sides of the waste piece must be parallel. It need not be used of course when the strips are long enough to reach to the runners. Sighting across the strips ensures the runners being free from winding (it is clear that the drawer could not run properly if the runners were in winding).
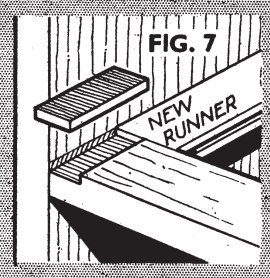
To make good any wear at the front drawer rails the best plan is that in Fig. 7. A small notch or groove is cut right across and a new piece of hardwood let in.
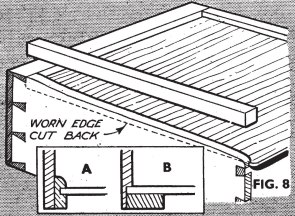
The Drawers. It is clear that it is impossible to add new strips to the bottom edges of the drawer sides as they are. They would be too rounded over and out of shape to make a joint. The only plan is to cut them back to form a straight edge and glue in new pieces. It may be necessary to vary the method slightly in accordance with the construction. For instance, most Victorian and later furniture will be found to be fitted with drawer slips as at A, Fig. 8, whereas older pieces were made as at B.
Generally, however, it is a case of cutting back the old wood as given in Fig. 8. Little need be removed at the back; it is at the front that most attention is needed. Mark a straight line along the side in pencil and ease away the wood with the chisel. When practically down and smooth as far as possible with the smoothing or block plane, finish off close up to the corner at the front with the bullnose.
Test the new piece to see that it beds down everywhere and glue down. There is no harm in using nails to hold the strip in position whilst the glue sets, providing they are pulled out later. Allow them to stand up for the purpose. The new strip should be full all round to allow for fitting. Test the drawer in position and trim where necessary. Do not lubricate the edges until after the new piece has been stained to match the surrounding wood.
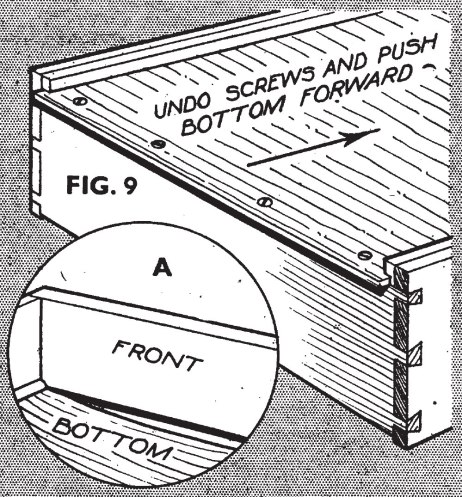
Drawer Bottoms. These often need attention, especially if in solid wood rather than ply. In most cases the grain runs from side to side, and, since in a deep drawer the shrinkage may be considerable, it is usual to allow the bottom to project at the back 1∕4 in. to 1∕2 in. This enables it to be pushed forwards into the front groove and be screwed again as in Fig. 9. A in this same illustration shows how the bottom is liable to sag at the front owing to its having pulled out of its groove. It is an annoying fault leading to papers and small items being lost. In bad cases it may sag so that it scrapes the drawer rail beneath.
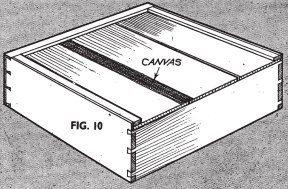
In older pieces of the 18th century the grain of drawer bottoms frequently ran from back to front, and the whole was jointed up to width and fixed in rebates worked in the sides (see B, Fig. 8). Being held rigidly they invariably split in course of time, especially along joints. In really bad cases the only remedy is to remove the whole, reshoot the joints, make up to width, and replace. In a slight opening, however, the simplest plan is to glue strips of fine canvas over the joints at the underside. Sometimes slivers can be inserted in the openings from above. These are levelled down after the glue has set and strengthened with canvas beneath as before. This is shown in Fig. 10.
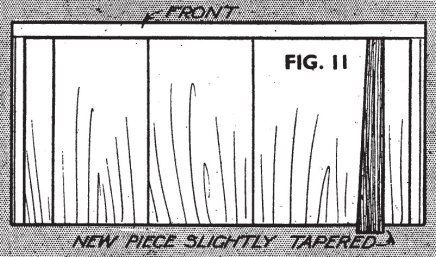
It sometimes happens that in these front-to-back drawer bottoms all the pieces can be removed except the two side ones which are glued and nailed in rebates and have bearing fillets below (B, Fig. 8). If the joints are good you can replace the parts straightway, gluing and nailing as you go. When you come to the last piece there will necessarily be a large gap, possibly 1∕2 in. wide. This will require filling. An excellent plan is to plane the edge so that the gap is about 1∕2 in. wider at back than at front. Then, when the last piece has been fixed, a tapered filling can be slid in from the rear. This is shown in Fig. 11.
If the main dovetails of the drawer are loose, the only plan is to knock the whole thing apart and re-glue. Mark the parts so that they can be replaced in the same positions, and scrape away all dried-up glue. Don’t drive nails into the joints, they look dreadful.
— MB