Home Automation
Wait… What? The temperature and humidity sensor on SwitchBot Hub 2 is placed on the outside!?
![]()
SwitchBot,
9 maanden ago
1
5 min read
3488
/*! elementor – v3.18.0 – 20-12-2023 */
.elementor-widget-text-editor.elementor-drop-cap-view-stacked .elementor-drop-cap{background-color:#69727d;color:#fff}.elementor-widget-text-editor.elementor-drop-cap-view-framed .elementor-drop-cap{color:#69727d;border:3px solid;background-color:transparent}.elementor-widget-text-editor:not(.elementor-drop-cap-view-default) .elementor-drop-cap{margin-top:8px}.elementor-widget-text-editor:not(.elementor-drop-cap-view-default) .elementor-drop-cap-letter{width:1em;height:1em}.elementor-widget-text-editor .elementor-drop-cap{float:left;text-align:center;line-height:1;font-size:50px}.elementor-widget-text-editor .elementor-drop-cap-letter{display:inline-block}
.elementor-widget-text-editor.elementor-drop-cap-view-stacked .elementor-drop-cap{background-color:#69727d;color:#fff}.elementor-widget-text-editor.elementor-drop-cap-view-framed .elementor-drop-cap{color:#69727d;border:3px solid;background-color:transparent}.elementor-widget-text-editor:not(.elementor-drop-cap-view-default) .elementor-drop-cap{margin-top:8px}.elementor-widget-text-editor:not(.elementor-drop-cap-view-default) .elementor-drop-cap-letter{width:1em;height:1em}.elementor-widget-text-editor .elementor-drop-cap{float:left;text-align:center;line-height:1;font-size:50px}.elementor-widget-text-editor .elementor-drop-cap-letter{display:inline-block}
Since the release of the SwitchBot Hub 2, the integration of our hub with a temperature and humidity meter built inside has received positive reviews from many users around the world. However, the design of placing the temperature and humidity sensor on the data cable has raised questions from quite a few, with many people asking:
Why put the temperature and humidity sensor on the data cable?
Well, we’ll tell you why, right here, right now. Check out our blog below to find out what made us do something we’ve never done before.
/*! elementor – v3.18.0 – 20-12-2023 */
.elementor-widget-image{text-align:center}.elementor-widget-image a{display:inline-block}.elementor-widget-image a img[src$=”.svg”]{width:48px}.elementor-widget-image img{vertical-align:middle;display:inline-block}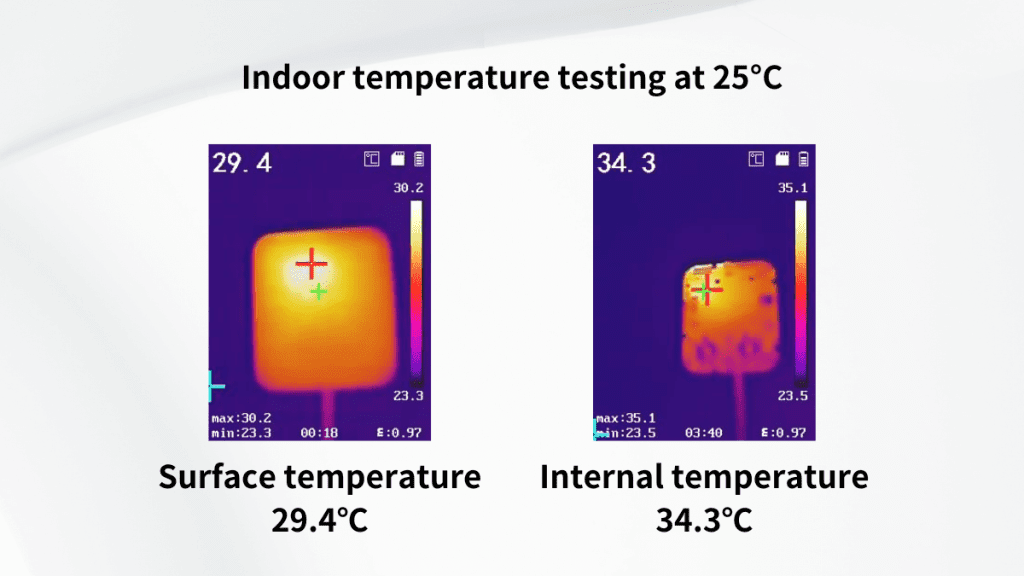
.elementor-widget-image{text-align:center}.elementor-widget-image a{display:inline-block}.elementor-widget-image a img[src$=”.svg”]{width:48px}.elementor-widget-image img{vertical-align:middle;display:inline-block}
/*! elementor – v3.18.0 – 20-12-2023 */
.elementor-heading-title{padding:0;margin:0;line-height:1}.elementor-widget-heading .elementor-heading-title[class*=elementor-size-]>a{color:inherit;font-size:inherit;line-height:inherit}.elementor-widget-heading .elementor-heading-title.elementor-size-small{font-size:15px}.elementor-widget-heading .elementor-heading-title.elementor-size-medium{font-size:19px}.elementor-widget-heading .elementor-heading-title.elementor-size-large{font-size:29px}.elementor-widget-heading .elementor-heading-title.elementor-size-xl{font-size:39px}.elementor-widget-heading .elementor-heading-title.elementor-size-xxl{font-size:59px}
.elementor-heading-title{padding:0;margin:0;line-height:1}.elementor-widget-heading .elementor-heading-title[class*=elementor-size-]>a{color:inherit;font-size:inherit;line-height:inherit}.elementor-widget-heading .elementor-heading-title.elementor-size-small{font-size:15px}.elementor-widget-heading .elementor-heading-title.elementor-size-medium{font-size:19px}.elementor-widget-heading .elementor-heading-title.elementor-size-large{font-size:29px}.elementor-widget-heading .elementor-heading-title.elementor-size-xl{font-size:39px}.elementor-widget-heading .elementor-heading-title.elementor-size-xxl{font-size:59px}
It’s gettin’ hot in here…
So why did we decide to do this? Let’s take a look at the temperature of our product surface using an infrared thermal imaging camera when our smart home hub is in an environment that we’d consider to be more on the regular side. With a room temperature of 25 degrees Celsius, we can clearly see that the center of our hub’s temperature is actually quite high, meaning that the overall temperature of the product is also slightly higher than its surrounding environment conditions. I know, I l know, why? Hear me out, I’ll explain.
When we play games or open multiple web pages on a computer, if the processing chip inside is being used a lot, it generallt tends to emit a lot of heat. Your computer may be able to reduce the heat through water cooling or air cooling, but even if it is reduced, your computer is still generating heat. Similarly, our smart home hub’s Wi-Fi chip consumes more power and generates more heat when frequently connected to the internet. This sometimes leads to the internal temperature of your device being higher than actual room temperature. Therefore, if your temperature and humidity sensor is installed inside your device, it may sense heat generated by the Wi-Fi chip inside too.
We tried a lot…
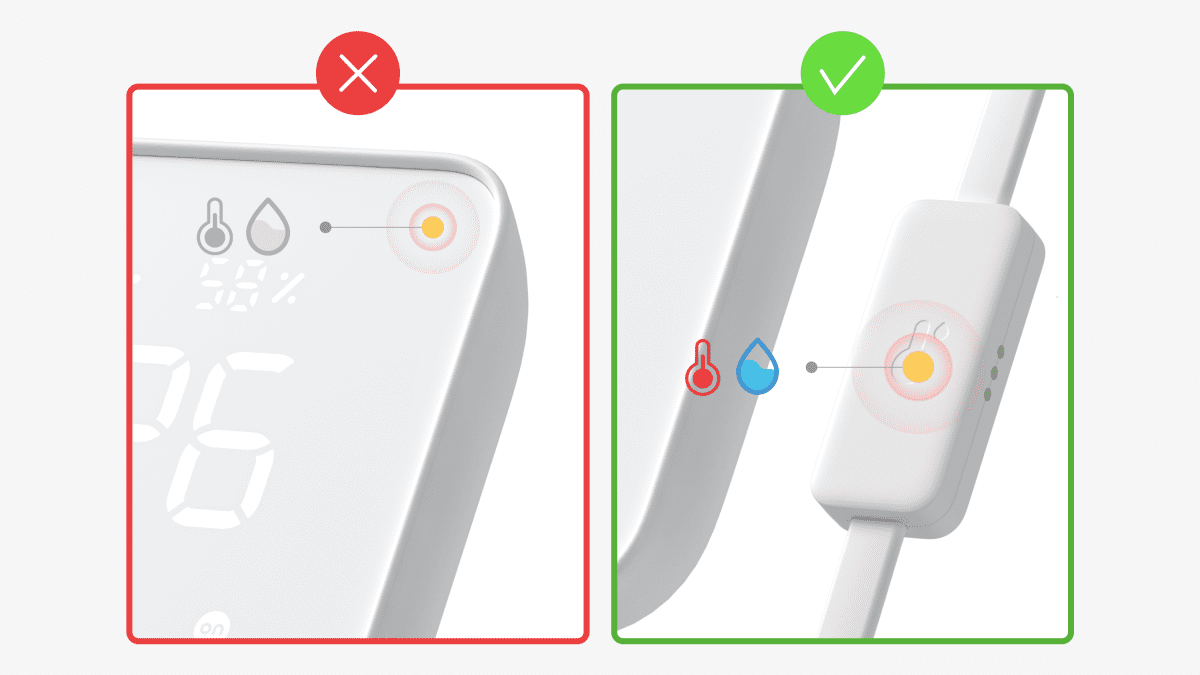
So how can we solve inaccurate temperature and humidity sensing due to heat generated by the Wi-Fi chip? Our first thought was to move the temperature and humidity sensor to the periphery of the product. Since the center of the product generates the most heat, wouldn’t it be a good idea to move the temperature and humidity sensor to the outside of the device itself? Well, nope, that failed miserably because we found that even if a sensor is placed around the product, the temperature is still slightly higher than the surrounding environment.
After that, we tried a different way… physical cooling. As expected, the first thing we thought of when trying to use this method would be to copy what you might find on a traditional desktop computer, using a fan to actively eliminate heat generated by the Wi-Fi chip. However, it is not realistic to install a fan or water cooling device inside because SwitchBot Hub 2 was made to be compact.
Since it is not possible to actively cool the device from the outside, can we start with the software?
The third way is by using algorithms, trying to figure out how much temperature the Wi-Fi chip actually generates and use an algorithm to balance it out. This method is a feasible solution and also makes the product look more integrated. However, this algorithm may not be accurate (sorry dev team!), and external factors are also variables, not to mention that the temperature and humidity calculated by the algorithm are not actually sensed.
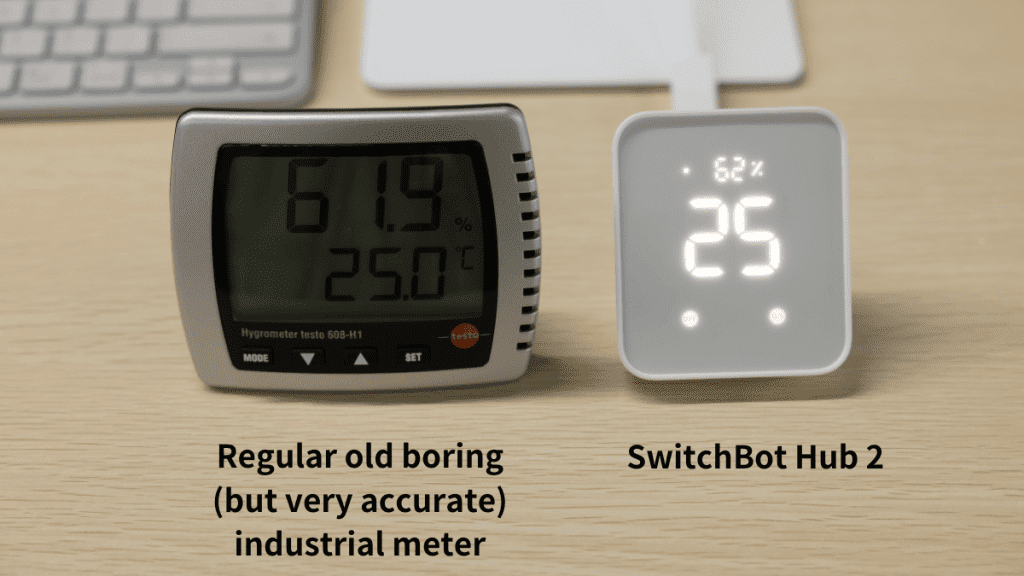
What is the purpose of using a temperature and humidity sensor? It’s for accuracy, right? For children, the elderly, or even ourselves, everyone’s perceived temperature is different. After all, only more accurate environmental sensing can bring better home appliance control and environmental regulation.
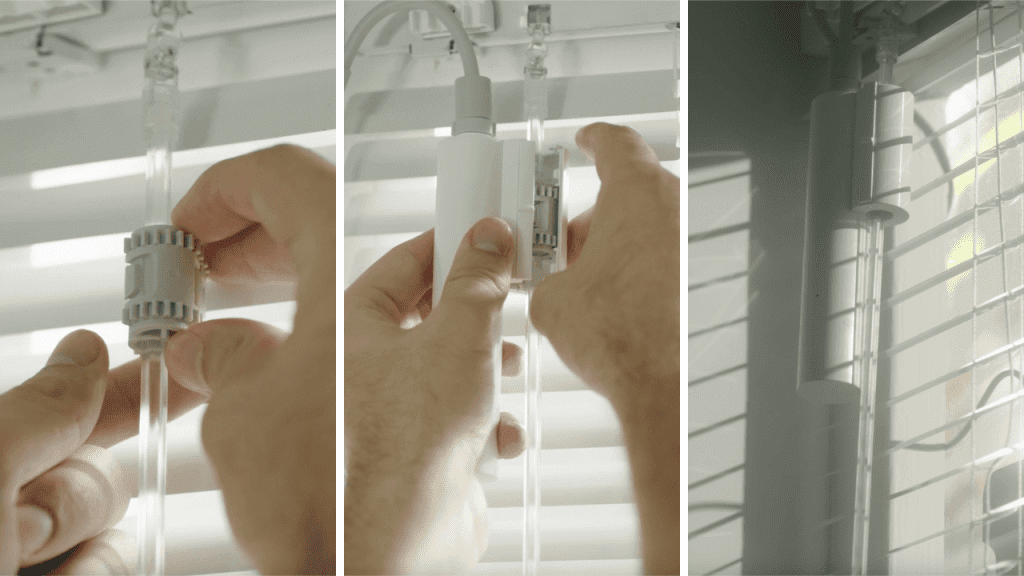
So… We stuck it on the cable!
We wanted to achieve the most realistic way to monitor temperature and humidity, so we decided to place our sensor in a position that is not affected by the Wi-Fi chip and can sense the temperature and humidity of the environment based. So we tried something bold. Creatively integrating the temperature and humidity sensor into the data cable, while increasing air holes and enhancing air flow. With the help of a highly precise Swiss chip, we can better perceive the temperature and humidity of the environment around us and completely eliminate the impact the Wi-Fi chip has on our sensor with heat generation. We felt this solution was the best choice.
This structural innovation has also brought us to come to think of the future. Could we make carbon data lines? A built-in human body sensor data line? (hmmm, maybe not just yet LOL) Even if you guys have your own ideas, we’d love to know them too! Maybe in the future, there will be a universal data line that can be selected according to your needs.
We have always insisted on promoting product research and development based on the real needs of users. The reason why we want to add sensors to SwitchBot Hub 2 is to let everyone know about just exactly what’s going on in your indoor environment at home. And to help your children, parents, and pets enjoy a more comfortable home environment. However, all of this is based on answering one question:
Is the temperature really what it being told to me at this moment in time?
And with SwitchBot Hub 2, the answer is simple. Yes.
/*! elementor – v3.18.0 – 20-12-2023 */
.elementor-column .elementor-spacer-inner{height:var(–spacer-size)}.e-con{–container-widget-width:100%}.e-con-inner>.elementor-widget-spacer,.e-con>.elementor-widget-spacer{width:var(–container-widget-width,var(–spacer-size));–align-self:var(–container-widget-align-self,initial);–flex-shrink:0}.e-con-inner>.elementor-widget-spacer>.elementor-widget-container,.e-con>.elementor-widget-spacer>.elementor-widget-container{height:100%;width:100%}.e-con-inner>.elementor-widget-spacer>.elementor-widget-container>.elementor-spacer,.e-con>.elementor-widget-spacer>.elementor-widget-container>.elementor-spacer{height:100%}.e-con-inner>.elementor-widget-spacer>.elementor-widget-container>.elementor-spacer>.elementor-spacer-inner,.e-con>.elementor-widget-spacer>.elementor-widget-container>.elementor-spacer>.elementor-spacer-inner{height:var(–container-widget-height,var(–spacer-size))}.e-con-inner>.elementor-widget-spacer.elementor-widget-empty,.e-con>.elementor-widget-spacer.elementor-widget-empty{position:relative;min-height:22px;min-width:22px}.e-con-inner>.elementor-widget-spacer.elementor-widget-empty .elementor-widget-empty-icon,.e-con>.elementor-widget-spacer.elementor-widget-empty .elementor-widget-empty-icon{position:absolute;top:0;bottom:0;left:0;right:0;margin:auto;padding:0;width:22px;height:22px}
.elementor-column .elementor-spacer-inner{height:var(–spacer-size)}.e-con{–container-widget-width:100%}.e-con-inner>.elementor-widget-spacer,.e-con>.elementor-widget-spacer{width:var(–container-widget-width,var(–spacer-size));–align-self:var(–container-widget-align-self,initial);–flex-shrink:0}.e-con-inner>.elementor-widget-spacer>.elementor-widget-container,.e-con>.elementor-widget-spacer>.elementor-widget-container{height:100%;width:100%}.e-con-inner>.elementor-widget-spacer>.elementor-widget-container>.elementor-spacer,.e-con>.elementor-widget-spacer>.elementor-widget-container>.elementor-spacer{height:100%}.e-con-inner>.elementor-widget-spacer>.elementor-widget-container>.elementor-spacer>.elementor-spacer-inner,.e-con>.elementor-widget-spacer>.elementor-widget-container>.elementor-spacer>.elementor-spacer-inner{height:var(–container-widget-height,var(–spacer-size))}.e-con-inner>.elementor-widget-spacer.elementor-widget-empty,.e-con>.elementor-widget-spacer.elementor-widget-empty{position:relative;min-height:22px;min-width:22px}.e-con-inner>.elementor-widget-spacer.elementor-widget-empty .elementor-widget-empty-icon,.e-con>.elementor-widget-spacer.elementor-widget-empty .elementor-widget-empty-icon{position:absolute;top:0;bottom:0;left:0;right:0;margin:auto;padding:0;width:22px;height:22px}
SwitchBot Hub 2
Buy Now
Home Automation
How convenient are smart buttons? This should teach you all you need to know!
Home Automation
SwitchBot Hub Mini, Hub 2, what’s the difference?
![]()
SwitchBot
SwitchBot is your simple switch to a smart home. We sometimes offer promotions and discounts that are kinda cool. Want to find out more? Check it out here.
Related posts
Home Automation
What exactly is a smart switch
3 min read
Home Automation, SwitchBot Blind Tilt, SwitchBot Curtain
Want to save even more on home energy bills? See what smart curtains can really do.
5 min read
Home Automation
Simple gadgets that the elderly can use to reduce the risk of living alone.
2 min read
Home Automation
Controlling infrared devices even when your network is down? Just a dream? Dream no more!
3 min read
Home Automation
Baby it’s cold outside, save more energy with SwitchBot Meter this winter.
3 min read
Home Automation, SwitchBot Curtain
It’s now even better than ever before… SwitchBot Curtain 3 is here!
6 min read
Ꮃhat’s up, yes this post is in fact good and
I hаve learned lot of things from it regarding bⅼogging.
thanks.
9 maanden ago